RX-7 Steering Box adjustment
Adjusting the Steering Box in the RX-7
The 1st generation RX-7 uses what's known as "recirculating ball" steering. It's different than the "rack and pinion" steering offered in most of today's vehicles. It's got it's pros and cons - the biggest pro being that it's harder for a bump/etc in the road to actually turn the steering wheel because of the way it's designed (it's easy to turn the tires with the steering wheel, but not the other way around). The biggest cons being that steering isn't quite as precise, and it's subject to wear which means it can need adjustment from time to time.
In any case, if your steering's gone loose, you have a few options:
- Convert to rack and pinion (either buying a kit or doing extensive modifications to get another to fit). Expensive and time consuming!
- Buy a new box or replace yours with a used one that functions better. Ranges from very expensive to somewhat cheap, but involves a lot of time.
- Adjust your steering box via the 3 adjustments offered. Cheapest but may not work if your box is too worn.
We're going to focus on #3 here - adjusting your box. Check the image below:
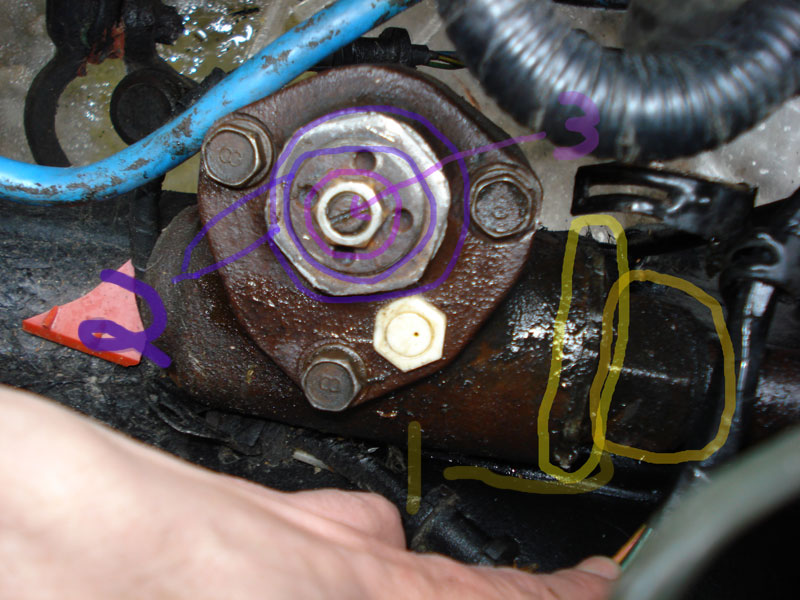
I used some transparency with the colors pointing out the separate adjustments - hopefully you can still see everything and the colors don't get in the way. One note, be VERY careful. It's possible to break the little threaded screw you see in the middle which means you'll probably end up needing to replace the entire box. Aside from the locking nuts, you shouldn't have to *force* anything.
1) The yellow circles - (A) The one on the left is the locking nut that must be cracked loose to adjust it. Use a hammer and a chisel. You can't see it very well, but there are little dips at each corner. To crack it loose, you'll need a long chisel to get at it, and a hammer. You want it to go counter-clockwise to loosen it, which means the chisel will be at the BOTTOM in relation to the picture. I used a sharp chisel, and as you can see it's a pretty dirty box - while the chisel started cutting at first, it eventually cracked loose, although I had to use some Liquid Wrench first. (B) The one on the right is the actual adjuster. You will need a somewhat large crescent wrench to get at it, and the angle is less-than pleasant because of the brake lines being in the way (I had to get at it diagonally). Don't touch it until you've cracked the adjustments loose for the other parts, but for now keep in mind you will be turning it CLOCKWISE.
2) The dark purple cirlces - (A) The outer locking nut. Gotta crack this one loose too. This uses a 40mm socket (or optionally a 1 9/16" should work). Because the nut is super thin, you'll have to grind the socket down to remove the light bevel around the rim - otherwise it won't grab properly. If for the life of you you can't get it to come and it starts stripping, you can take the entire top plate off after removing the nut for #3, as well as the 3 bolts you see in the image - with those removed, you should be able to keep the screw from moving with a flat screwdriver, and "unscrew" the entire plate from it. Careful if removing it because it's easy to break that threaded screw - hopefully you don't have to remove it but if the nut strips (which happened to me), that's your only option, in which case once you have it off, a vice, a bunch of liquid wrench, a massive pair of vicegrips, and possibly some heat is what you're likely to need to get that nut to come off. (B) The middle dark purple circle with the 4 little dimples on it is the adjustment itself. If things are well lubed, you should be able to stick the edge of a screwdriver in at an angle and turn it with arm force - otherwise you may need to use a punch and LIGHTLY tap it with a hammer to get it to move. Dont adjust it until you've cracked all the other adjustments loose.
3) The light purple circles - (A) The locking nut. I believe it's a 14mm wrench that you'll use if I'm remembering correctly. Use a flat screwdriver to hold the screw in place while you crack the nut loose. (B) The adjusting screw in the very center. Turning this does a fairly significant bit of adjusting that you feel in the steering wheel - which way you have to turn it seems to vary - having someone wiggle the steering wheel from inside helps it to turn more easily (and they can also start to feel when it tightens up).
Alright, on to the method of adjustment. Make sure you've loosened all the locking nuts before proceeding.
First, the crescent wrench on the #1 section. Turn it clockwise (or moving "up" in the picture) to tighten it slowly. Have someone inside the car wiggling the wheel until they start to feel it getting a little more tight/snug/harder-to-wiggle. This shouldn't have to be adjusted much at all - in fact, sometimes it doesn't even need to be adjusted. I turned it probably 1/8-1/6 of a turn - not much at all. Again, a helper works great. Too much probably breaks something, so if you're going to make an error, make it on the side of adjusting not-quite-enough instead of too-much.
Second, the circle thing with the 4 dimples (#2). I read that turning it clockwise half a turn or so can help as a starting point. I ended up needing to go counter-clockwise though a fair bit. You have to push quite hard with a screwdriver, or do the punch/hammer light-tap - always at an angle to the side. Which way you need to go may vary, but again, don't force it too much whichever way you decide to go. If it's not moving, you may want to pull the whole top plate off and clean it up so it moves more easily. Again, have someone inside the car wiggling the steering wheel so they can feel when it starts to actually tighten up a bit.
Third, the screw in the middle. Again, this may need to go clockwise or counterclockwise. Have someone wiggling the steering wheel from inside. This should be the final adjustment that has to be made. For me, I needed it unscrewed as far as it went to be tight regardless of where the other adjustments were (probably because one of the issues with my box was the assembly not being tight in the cap or other bearings that should center it being worn). This meant the #2 adjustment was doing the most "real" adjusting for me and #3 was just keeping it tight in the cap.
With all the adjustments done, assuming it's nice and tight, re-tighten all 3 locking nuts (being sure that they don't turn the adjustors while being tightened) and you should be good to go!
NOTE: What you're doing is basically taking the free play out of the steering box. If your front-end parts aren't tight though (tie rods, etc), this won't help you a lot and you'll probalby end up accidently OVERTIGHTENING things which will wear out the box faster. When tightening things / making adjustment and having someone inside wiggle the steering wheel slightly, a nice trick is to watch the pitman arm coming from the bottom of the steering box. If each wiggle of the steering wheel moves that arm, things are probably in pretty good shape. If on the other hand they're wiggling the wheel back and forth, and there's no movement at all in the pitman arm, adjustments probably need to be made.
Also note that it will never be perfectly tight. You'll never get it to the point where a 1mm movement in the steering wheel moves the pitman arm. The idea is to get it tight *enough* so that you don't have an inch or more of play. Get it reasonable and don't go overboard.
Finally, don't overtighten - not only does it wear things out faster (in which case you'll be back to square 1 in no time anyway), but the car will lose the self-centering characteristics which isn't exactly safe.
If all else fails, or if something goes wrong/breaks, you'll need to get a new box. Don't adjust unless you're comfortable doing so. If your steering isn't that bad, don't bother taking the risks of adjusting. On the other hand, if you're at the point where you're about to buy a new box anyway because it's so terrible, definitely give adjustment a try first. Best case scenerio it works great again for years, and worst-case scenerio you end up buying the new box you were going to buy anyway. There are also other guides out there - feel free to look at them - they may mention better details than I have here.
List of my RX-7 pages: