Rebuilding the RX-7's Nikki Carb
Rebuilding the RX-7's Nikki Carb yourself
IF IT AIN'T BROKE, DON'T FIX IT!
I'll start off with that bit of advice. I've had a lot of headaches with these carbs to the point where I'd say if it's running perfectly fine, don't create headaches for yourself by pulling it apart unnecessarily.
That said, BEFORE YOU START:
1) Get a hold of a carb rebuild kit.
-I've been able to re-use gaskets in the past, but most had a tendancy to stick to the carb sections and rip.
-The washers for the fuel inlet/outlet hoses have a tendancy to leak a bit. I've read that some kits come with
paper gaskets which are terrible, and that you're better off using the stock aluminum crush washers (credit to
Sterling of the rx7club.com forums). I'd heed that advice - at most I've had to slightly tighten a little extra
when reusing the stock ones.
-Most auto parts stores can get the kits. Some may say that they need a number from the side of the carb - they
don't. They're all pretty much the same with very minor differences (Canadian Tire did this to me). If
you'd prefer to buy online, since I borrowed a couple pics for this site from the Mazdatrix.com website, I find it
only fair to recommend them for kits. Click here to hop to the carb section on
their site. I'll note that I haven't used them, but they're fairly popular for a lot of RX-7 stuff. And
no, I don't get any commission/incentives for recommending them :p
2) Take notes!
-Get a pen and paper or take pictures, especially when disconnecting stuff while it's in the engine bay - it'll
help immensely.
-Same as above when pulling the carb apart. I found it helpful to put everything in a line as I took it off so I knew
which order to put things back on in.
-Pop holes in a piece of paper or cardboard for airhorn screws to preserve the position.
-Pop holes in a piece of paper or cardboard for jets to preserve the position.
3) Use Simple Green to clean the parts and rinse off with water afterwards (credit to Sterling of the rx7club.com forums). I tried gunwash, soap & water, brake cleaner, etc, and nothing worked as well as this stuff. Use a brush to get the grit off. I used a toothbrush on my previous non-simple-green attempts but it gummed up fast. Seriously, Simple Green. You can get it at Canadian Tire. It's amazing stuff.
4) A compressor/air hose works great for blowing out passages.
5) You're not reaaaally supposed to use metal objects to poke through the holes of stuff in case you accidently
enlarge them. That said, burning the end of a twist-tie (the ones you get with garbage bags) left me with a nice tiny
wire that worked great for making sure the holes in all the jets were clear.
TAKING IT OFF:
1) Use a haynes or shop manual for removal instructions. If you'd rather not spend the time reading, just disconnect everything connected to the carb, labelling as you go. If you've done the "rats nest removal", this'll be significantly easier. I wouldn't recommend doing the rat's nest removal at the SAME TIME mind you, as you're much more likely to get mixed up when reinstalling later.
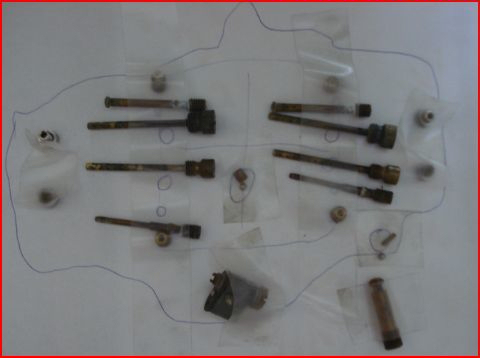
2) 3 of the 4 12mm bolts holding the carb to the intake manifold come off pretty easily. the 2 on the passenger side
can be grabbed with a wrench (the one closer to the firewall with a socket if you prefer although you must remove the
altitude compensator above it which is held on by 3 screws). The driverside-front one's easy enough with a
socket/ratchet. The last one on the other hand is AWFUL. It's located on the rear drivers-side corner of the carb
amongst a bunch of clutter and can be near-impossible to get at.
-If you've removed the rats nest, you may be able to get it with a regular wrench.
-If you start pulling parts off the rear of the carb, you'll get a tiny bit more room to work.
-The best option is to either buy a special wrench, or make your own by bending a 12mm wrench. I did the latter and it
looks like this:

Torch + Vice + Hammer = a 12mm wrench that saves hours of agony removing that darned 4th carb nut
3) With all the nuts off (don't lose them - it's easy), slowly lift the carb off. Anything you forgot to disconnect will catch, so be slow so that you don't bend/brake anything. If you've left the accelerator cable etc connected, you should be able to tip the carb well enough to gain better access.
TAKING IT APART:
1) Again, notes and pictures. Follow a Haynes, carb, or shop manual.
2) The airhorn has screws along the top - all easy to get at. Make sure you dont forget the long center bolt (the one that the air cleaner wingnut attches to). Label them, make sure you know where they go.
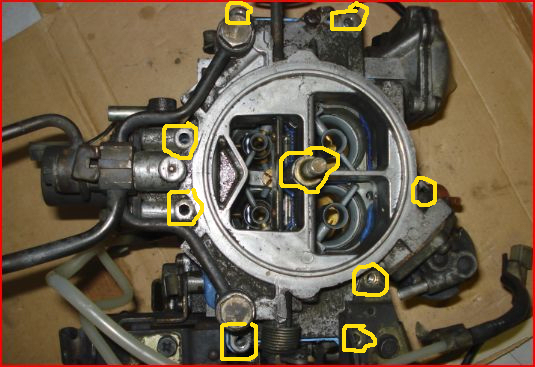
Screw locations are circled. The piece attached to the bottom right also has a screw on the side (pulling it off can be
tricky as it's spring loaded). Keep track of where each screw goes (poking holes in a piece of paper in respective
locations and putting the screws in the holes helps).
The choke assembly, not shown in the picture (but located just below) must be removed next. There are 4 screws holding it on - 2 were on the bottom right of the air horn (that you already removed), the other two are accessed from the left side. With them off, the choke assembly should pull right out. You'll probably hear the srping boing as it's pulled off the arm to the choke linkage.
You'll also need to remove the pin holding the fast idle arm - it's not labelled in the picture, but it's barely visible at the bottom center, connected just to the bottom right of the spring. Pull the pin, take off the washer, and the arm should pop right out.
With all the screws, the center bolt, choke assembly, and the fast idle arm removed, the air horn should lift up. It may need a light tap if it's stuck to the gasket. If it's not coming, make sure you haven't missed anything not mentioned here. Pull it STRAIGHT up, otherwise the floats will catch on the sides and could bind/bend. Lift very slowly - you may need to use a knife as you lift to cut the gasket from the main body if it's sticking, otherwise it could rip and/or pull down on the float and pins.
The altitude compensator should come off next - a matter of 3 screws on the side of the air horn (alternately, you can remove it before the air horn comes off.
The float bowl vent solenoid will be either threaded in, or attached by means of 3 screws - If attached by 3 screws it's relatively easy to get the entire assembly out - ensure that you don't lose the spring inside though. If threaded in, there's another outer assembly that has to come out as well - I'd imagine it just unscrews but on the carb I worked on it was pretty seized in.
Finally, if you wish to remove the fuel rails, there's a bolt on the side as well as 2 bolts holding it to the top. Be careful when disconnecting the stuff on the side - there are washers and you want to ensure you don't lose the order they go in. In addition, be careful with the top bolts - there's a screen contained inside which can fall apart pretty easily.
3) With the airhorn off the top, you should have access to the main body.
Remove any parts attached to it, including the secondary advance diaphragm (3 screws holding it to the side and a pin/washer holding it to the arm) and throttle switch (2 bolts) from the front, as well as the other pieces connected to the back (deceleration dashpot, throttle opener, the plate that the throttle/choke cables mount to, etc).
With most of these out of the way, you should be able to get at the accelerator pump. It's connected to an arm that goes to the lower throttle body. Removing the pin and washer should disconnect it at that point. Removing the accelerator pump itself from the main body is a little more tricky, as there are 4 screws, and 1 is inaccessable because of the pin going through it. To remove it, you must first remove the bottom-left screw holding the accelerator pump to the main body - otherwise the head of the pin will get stuck when you slide it. Next, there's a circlip which must be removed from the pin at the right side. Be CAREFUL as when it pops off, it's easy for it to go flying - do this in a clean area. With the circlip off, the pin should push through. Over time they tend to stick, so you may need a small punch or a screwdriver and some slight tapping with the hammer.There are also 2 washers contained within to take note of. With the pin finally out the rest of the way, the arm should fall off of the pump, and you should be able to remove the remaining screws and then the pump itself. If you're plannning to reuse the pump, be careful not to rip it.
With everything else removed from the main body, it can now be detached from the lower throttle body. There are 4 slotted bolts holding it on - use either a wrench or a screwdriver to disconnect it. Pull it up
You should now be left with something looking like this:
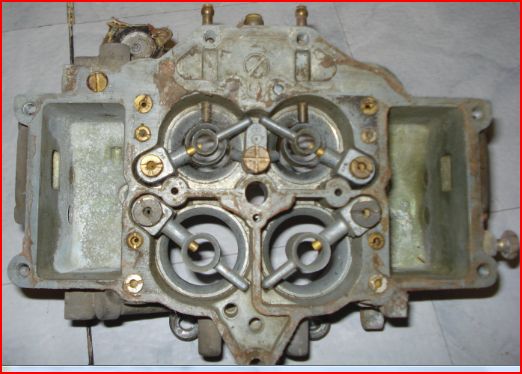
This one is relatively clean. You can see the destroyed remnants of the accelerator pump diaphragm (detached) in the top left.
4) Finally, the lower throttle body should also have very litttle left attached to it aside from the arms/linkages for the primaries and secondaries:
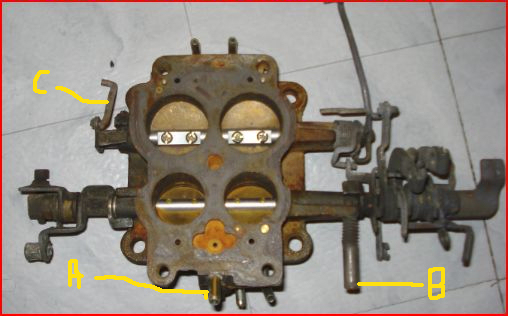
I've labelled a couple things just for information's sake. (A) is actually BELOW the vacuum port you see and is
the idle MIXTURE adjusting screw. (B) is the idle SPEED adjusting screw. (C) is the link between the secondary advance
diaphragm and the secondaries themselves. Knowing where they are may help you for adjusting/troubleshooting in the
future.
CLEANING:
1) Make sure anything extra's been removed from all 3 pieces! You should be left with the Air horn (which will still have the choke and lever), Main body (which will still have the jets), and the lower throttle body (which will still have the throttle plates and levers). There's usually NO reason to disassemble the linkages themselves as long as they're operating freely.
2) The jets should be removed before soaking/cleaning the main body. A couple images to help:
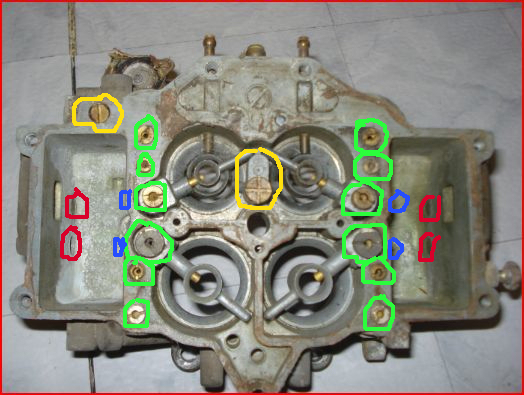
The screws circled in YELLOW are for the ACCELERATOR PUMP circuit. Each has a weight and checkball below - you'll
have to turn the carb upside down and possibly even give it a tap for them to fall out - be very careful not to lose
them! The one on the center of the carb also holds down the jets.
The screws circled in GREEN are simple enough to pull. Keep track of where each of them goes.
The BLUE circles represent the ones accessed from the sides. You have to remove the 12mm bolts in the positions near
the RED circles from outside the carb to get at them. Be careful, both the bolts and the jets for the sides have
washers - don't lose them.
Once everything's been removed, you can pop out the 4 jets over the primary/secondary bores. They may not come out easily. If they don't, turn the carb upside-down, use the back (plastic) end of a screwdriver, and give them a few taps. DONT use the blade end of a screwdriver - it'll simply cut into / damage the aluminum (ask me how I know).
Above is the little diagram I drew to keep track of where each jet went (it's upside-down relative to the other
photo above). Not a bad idea to tape them down - anything from a bump to pets can easily move things around and mess
them up.
3) With the jets off, time to SOAK the air horn, main body, and lower throttle body. I love Simple Green for this. I typically start with the main body, toss it in an ice cream pail, and dump some Simple Green in to about 1/3 of the way, then add some water to make sure it's covered. Grab a toothbrush and start scrubbing. Don't leave it in too long or you'll see what looks like oxidizing start to happen. Once it's clean, take it out of the pail, and rinse well with warm water. Then dry.
Go on to the next part, same process. If you used an icecream pail, you'll notice that the linkages on the lower throttle body and airhorn don't allow them to completely fit in - just do 1/2 at a time. Again, rinse very well afterwards and dry.
Next, make sure all the passages are clear, particularly in the main body and lower throttle bodies. Compressed air works extremely well for this. Make sure every passage flows air.
4) Ensure the jets are clear and that air will pass through them. A little soak in simple green followed by a rinse can help. Do them ONE AT A TIME so you don't mix them up and be sure to throroughly DRY them afterwards. If the holes are pretty plugged, you can strip the plastic from a twist-tie (same ties used for garbage bags), and use the wire to clear most of them.
5) If your carb kit did not come with an accelerator pump, you may want to check to make sure the rubber diaphragm isn't cracked/leaking. Be careful though, sometimes the edges like to stick to the metal parts when you're removing it - if they tear you'll need a new one anyway.
REASSEMBLING:
1) Make sure everything's perfectly clean and dry.
2) If the float levels were fine beforehand, do NOT adjust them.
3) Reassembly is pretty much the opposite of removal. However, a few things can cause minor headaches. For example, if the choke level (that connects to the cable) isn't pulled up before the air horn is put on, you won't be able to get it back up unless you disconnect a bunch of stuff, or remove the air horn again.
4) When putting the carb back on the car, if you've adjusted float levels for any reason, you may want to make
sure the float level is accurate before hooking everything up:
-Attach both fuel hoses
-Plug in the electrical connector for the vent solenoid (right below the fuel hoses)
-Attach/tighten ONE bolt (otherwise you won't get a good ground for the solenoid and it WILL flood)
-Turn the key to ON but do NOT try to start the car.
-Look under the hood. Make sure gas isn't leaking. Pay special attention to where the fuel inlet/outlets connect to
the carb.
-Look down the carb - make sure the jets aren't pouring gas.
-You may want to turn the throttle by hand to ensure the accelerator pump is working properly.
-Check the float bowl levels to make sure they're good (you'll need a mirror for the rear one).
-Assuming all is well, turn the key off, disconnect the battery, and continue installing/connecting everything.
STARTING IT UP:
1) Turn the key on. Look under the hood, make sure no gas is leaking.
2) Start the car. If it wasn't flooded before you took the carb off and everything's working correctly, it should start without issue.
3) Take a look down the carb - make sure the fuel coming from the jets looks uniform and even on both sides.
4) Let the car warm up to operating temperature. Hit the gas a couple times to make sure the engine speeds up smoothly and uniformly (if it sputters/stalls you may have an accelerator pump issue).
5) Once warm, take it for a spin and go a little hard on it to get the secondaries opening. If it struggles when the secondaries should be opening there could be a problem in that circuit.
6) Done! Enjoy the fact that you'll probably get at least another 10 years out of the carb :)
List of my RX-7 pages: