How to fix worn out mouse feet
Problem: You have a mouse, and the feet have been worn out, or worn off to the point where the mouse is no longer gliding, and even simply dragging against the mouse-pad.
First, my story... I bought a Logitech Cordless Desktop, which includes a wireless keyboard and the wireless MX 700 mouse. I also bought a Ratzpad GS mousepad which is basically a hard plastic pad. It cost me about $150 for the set. Unfortunately, the mouse is rather heavy, and the mousepad is a rather coarse material. After about a year, I started hearing a scraping sound when using the mouse. It also wasn't gliding the way it used to. Flipping it over, I was horrified to see that the feet on one side had completely worn down, the weight of the mouse against a coarse pad being the obvious cause. Having spent a good chunk of money on this mouse, I decided it would be better to fix rather than replace the mouse. After a little searching, I found that you could buy little teflon stickers that you simply stick to the feet which is supposed to help. However, even these stickers can be pricey, and I knew they'd only last a few months. I wanted a permanent solution. So here's what I came up with...
Required Materials:
- Mouse
- Guitar pick (other thin plastics will work as well)
- Scissors
- Sand paper
- Toothpick
- Goop (or another glue)
- Rubbing alcohol
I used a guitar pick, as we have many lying around, and it was the first available material that I saw that would work. Guitar picks can be had for about $0.25 each, and you really only need one (unless you make a mistake cutting in which case two would be a good idea). A medium or light pick works the best. Extra-thin picks are too flimsy, and thick are too.. well, thick. If you can't get a hold of a guitar pick, any flat thin plastic that's can be cut should work too. See what you have lying around. Remember, if the plastic you choose is too thick, the optical laser will be too far away from the mousepad, and your mouse won't track properly.
What I basically did was cut the pick into 5 sections, which I then trimmed to be oval shapes, slightly larger than the original mouse feet. I then sanded the edges smooth, and sanded both the "new" mouse feet and what was left of the "old" ones, to ensure that there would be microscopic grooves for the glue to "grab". I quickly cleaned both sanded areas with rubbing alcohol to help clean them and remove any oils. Once the rubbing alcohol had completely evaporated, I used a toothpick to place a very small dab of goop to the "new" mouse feet. I pressed them in place, and once the glue was tacky enough to keep them from sliding, I carefully placed the mouse down so that the weight of the mouse would help keep contact between the mouse and the new feet while the glue dried. A few hours later, I was up and running again.
Here is a list of methods to follow (the basic methods I performed):
- Cut the pick into the desired number of mouse "feet". Trim to be slightly larger than the original feet.
- Sand the new mouse "feet" around the edges to smooth them and keep them from "catching" anything.
- Sand the new mouse feet where they are going to contact the old feet. Sand the old feet as well. Don't go crazy, just sand a little to rough up the surface a bit.
- Use rubbing alcohol (on a tissue or Q-tip) to clean the new and old feet.
- Using a toothpick, apply a small amount of glue to the new mouse feet. Don't go overboard.
- Press the new feet on to the old ones. Hold them in place.
- Once the glue is tacky enough that the new feet won't fall off or slide, carefully place the mouse down on a flat surface (put a piece of paper under the mouse in case you used too much glue and it seeps out). Make sure you are careful in putting the mouse down, as you don't want the mouse to slide off the new feet, and you don't want the new feet to move out of position.
- Wait.
- After a few hours, once the glue is dry, you should be good to go.
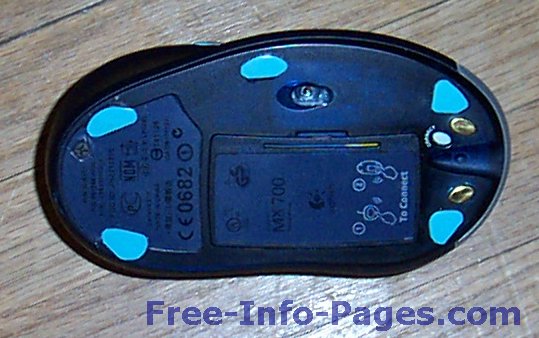
My mouse, complete with the 5 new "feet" cut from a guitar pick.
The Result
It has been close to a year since the repair operation, and my mouse is still going strong. Note that my mouse receives a lot of use (so much that the silver color is worn off over the mouse buttons where my fingers are). I can see where the new feet have begun to wear, but I'm sure they'll last at least a couple more years, probably much more. The feet don't interfere with the charger (one of my worries), and the only limitation I can see so far is that the new feet might catch on a cloth or foam mouse pad. Not a concern for me, since I don't like and don't use the thick cloth/foam pads, but if you do use that type of pad, it might be a good idea to make sure there aren't any edges at all that might catch when you cut/sand the new feet.
Following these steps can help you to add new life to a mouse, without having to constantly buy new teflon replacement feet. This is a permanent fix, great for a do-it-yourselfer, and one that has worked well for myself. Enjoy!